In this tutorial, we will go over how to install Magento 2.3. on Ubuntu 18.04, including some common performance and security configurations.
You will learn how to start with Magento development.
This article is written by Andrey Zhurba.
Andrey Zhurba is a DevOps ninja at GoMage and a person who knows everything about servers and their optimization. He has over five years of experience in the DevOps sphere and applies his broad ksnowledge and expertise in daily tasks. Andrey knows how to build high-performing and cost-efficient server infrastructures that support eCommerce businesses of our clients.
Development Get a robust PWA
Supercharge your eCommerce efforts with superb UX and ‘superfast’ speed. Build an eCommerce PWA from scratch or save time and money using GoPWA Storefront.

Prerequisites
Before you proceed with this guide and Magento development, a few steps should be completed first.
The demands of Magento processing operations, along with Magento upgrades and extensions can require up to 2BG of RAM. This will ensure that all of the software involved in managing the store will have enough memory to run smoothly.
You will need access to a non-root user that has sudo privileges. If you haven’t done this yet, run through the initial server setup provided in Step 1 – Server Setup with Ubuntu 18.04.
Additionally, this guide is based on the LAMP (Linux, Apache, MySQL, and PHP) stack, so you need to have it installed on your server. If you don’t have these components already installed and configured, you can follow Step 2 – LAMP installation on Ubuntu 18.04.
You will also need to have an account registered with Magento Marketplace. You can go to the marketplace and register it now or do it during Step 4.
Step 1 — Server Setup with Ubuntu 18.04
Before you move to Magento 2.3 installation on Ubuntu 18.04, you need to perform a basic server setup and configuration.
Logging in as Root
To log into your server, use the server’s public IP address and private key to log in with your root user’s account. Use the following command to log in as a root user.
ssh root@your_server_ip
Since the root user has very broad privileges, it is not recommended to use it on a regular basis. Thus, you need to create an alternative user account with a reduced scope of permissions for daily tasks.
Creating a New User
Once you are logged in as root, add a new user account that you will use throughout this guide.
The following command creates a new user called sammy, but you can replace the name with the one you need:
# adduser sammy
You will be asked a few questions, starting with the account password. Provide a strong password and fill in any additional information or skip these steps. Just hit ENTER to skip any field that you don’t want to fill in.
Granting Administrative Privileges
Now that you’ve successfully created a new user account, you need to grant administrative privileges to your new user, creating a ‘superuser’. This is required to avoid the need to log in as a root user to perform actions that need root privileges. After granting administrative rights, you will be able to use a normal user to run commands with administrative privileges by putting the word sudo sudo group:
# usermod -aG sudo sammy
Now, when logged in as your regular user sammy, you can type sudo before commands to perform actions with superuser privileges.
Setting Up a Basic Firewall
Ubuntu 18.04 servers can use the UFW firewall to make sure only connections to certain services are allowed.
Different applications can register their profiles with UFW upon installation and allow UFW to manage these applications by name. OpenSSH, the service that allows you to connect to the server now, has a profile registered with UFW.
You can check it with the following command:
$ sudo ufw app list
You will get the following output:
Output
Available applications:
OpenSSH
You need to make sure that the firewall allows SSH connections so that you can log back in next time. Type the following command:
$ sudo ufw allow OpenSSH
Afterward, enable the firewall by typing:
$ sudo ufw enable
Type 'Y' and press ENTER to proceed. You can see that SSH connections are still allowed by typing:
$ sudo ufw status
You will get the following output:
Output
Status: active
To Action From
— —— —-
OpenSSH ALLOW Anywhere
OpenSSH (v6) ALLOW Anywhere (v6)
Step 2 – LAMP Installation on Ubuntu 18.04.
A ‘LAMP’ stack is a group of open-source software that is installed on a server to host dynamic websites and web apps. This term is an acronym representing the Linux operating system, Apache web server, MySQL database, and PHP for dynamic content processing.
Installing Apache and Updating the Firewall
Use the following commands to install Apache on your servers:
$ sudo apt update
$ sudo apt install apache2
Since these are executed with root privileges, you will be asked to provide your sammy’s password to verify commands.
After you’ve entered your password, apt will tell you which packages it plans to install and how much disk space they’ll eat up. Press 'Y' and hit Enter for the installation process to proceed.
Adjust the Firewall to Allow Web Traffic
Now you need to adjust your firewall settings to allow HTTP and HTTPS traffic. Use the following command to check that UFW has an application profile for Apache:
$ sudo ufw app list
Output
Available applications:
Apache
Apache Full
Apache Secure
OpenSSH
If you look at the Apache Full profile, it should show that it enables traffic to ports 80 and 443. Use the following command:
$ sudo ufw app info "Apache Full"
Output

Profile: Apache Full

Title: Web Server (HTTP,HTTPS)

Description: Apache v2 is the next generation of the omnipresent Apache web

server.
Ports:
80,443/tcp
Use the following command to allow incoming HTTP and HTTPS traffic for this profile:
$ sudo ufw allow in "Apache Full"
You can check that you’ve configured everything right by visiting your server’s public IP address in your web browser:
http://your_server_ip
Installing MySQL
Now that your web server is up and running, it’s time to install MySQL, a database management system. MySQL will provide access to databases where your website will store information.
Again, use apt to acquire and install this software:
$ sudo apt install mysql-server-5.7 mysql-client-5.7
After you type itn this common, you will see the list of packages that will be installed and how much space they will take. Press 'Y' to continue.
When the installation is complete, you need to run the security script that comes pre-installed with MySQL to remove some dangerous defaults and lock down access to your database system. Start with the following command:
$ sudo mysql_secure_installation
This will ask if you want to configure the VALIDATE PASSWORD PLUGIN. Press 'Y' to enable it or anything else to continue without its enablement. Right now, you can simply skip this stage.
Press 'Y' for the rest of the questions and hit ENTER for all other prompts. This will remove some anonymous users and the test database, disable remote root logins, and load these new rules so that MySQL immediately respects the changes you have made.
If you want to use a password when connecting to MySQL as root, you need to change its authentication method from auth_socket to mysql_native_password.
Open up the MySQL prompt from your terminal:
$ sudo mysql
Next, check which authentication method each of your MySQL user accounts use with the following command:
SELECT user,authentication_string,plugin,host FROM mysql.user;
If your user relies on the auth_socket plugin, run the following command to change it to password authentication. Don’t forget to provide a strong password:
mysql> ALTER USER 'root'@'localhost' IDENTIFIED WITH mysql_native_password BY 'password';
Then, run the following command which tells the server to reload the grant tables and put your new changes into effect:
mysql> FLUSH PRIVILEGES;
Check the authentication methods used by each of the users again to confirm that root no longer uses the auth_socket plugin:
mysql> SELECT user,authentication_string,plugin,host FROM mysql.user;
Once you confirm this, you can exit the MySQL shell by using the following command:
mysql> exit
Your database system is now set up and you can move on to the next steps.
Note: Please note that we will provide you with the needed commands to install PHP later in this guide.
Step 3 — Configure Apache and PHP
Before you download and install Magento, Apache and PHP need to be configured to properly handle Magento traffic and computing tasks. Some additional modules will need to be installed and activated.
Apache Virtual Host
First, you need to configure a virtual host file so that Apache knows how to manage our Magento site correctly. You can use a text editor to create a new virtual host file in /etc/apache2/sites-available/. In this example, the virtual host is called magento, but you can name it something else if you prefer.
$ sudo nano /etc/apache2/sites-available/magento.conf
Magento’s virtual host needs are fairly simple. Begin with a <VirtualHost> tag that listens for all traffic from port 80, the standard HTTP port. Then add a line telling Apache where to find your site’s files with the DocumentRoot directive:
<VirtualHost *:80>

DocumentRoot /var/www/html/magento

</VirtualHost>
You need to add some additional parameters for Magento to work properly. Inside of the <Directory> tag pointing to your document root, we’ll enter the options for Apache’s directory indexing, symlink support, and multilingual support. We’ll also add a line that allows .htaccess files to override Apache settings, which provides more fine-grained control of individual folders.
. . .

<Directory /var/www/html/magento>

Options Indexes FollowSymLinks MultiViews

AllowOverride All

</Directory>

. . .
With all of these components in place, your virtual host file will look like this:
<VirtualHost *:80>

DocumentRoot /var/www/html/magento/

<Directory /var/www/html/magento/>

Options Indexes FollowSymLinks MultiViews

AllowOverride All

</Directory>

</VirtualHost>
When you’re finished writing up the server block, save and close the file. To enable the new site with Apache, use the a2ensite command:
$ sudo a2ensite magento.conf
You might be asked to reload the system with the following command:
$ sudo systemctl reload apache2
You also need to disable the default virtual host that came with Apache, as it will conflict with our new virtual host. To disable a site with Apache, use the a2dissite command:
$ sudo a2dissite 000-default.conf
After that, you need to reload your apache server with the following command:
$ sudo systemctl restart apache2
PHP Settings
Now, you need to install PHP and all the necessary modules. Type in the following commands that will allow you to install the supported by Magento version of PHP:
$ sudo apt install software-properties-common -y

$ sudo add-apt-repository ppa:ondrej/php -y
$ sudo apt update && sudo apt install php7.3 php7.3-gd php7.3-intl php7.3-soap php7.3-pdo php7.3-mysqlnd php7.3-opcache php7.3-xml php7.3-mysql php7.3-mbstring php7.3-bcmath php7.3-json php7.3-iconv php7.3-curl php7.3-dom php7.3-zip zip unzip -y
The above extensions will allow Magento to operate properly, like HTTP requests, image thumbnails, etc. Now that you have all of the packages that you need, you can enable URL rewriting support for Apache and encryption support for PHP:
$ sudo a2enmod rewrite
Once all of these configuration and extension changes have been made, it’s time to restart the Apache server instance so that the changes are applied:
$ sudo service apache2 restart
Step 4 — Create a MySQL Database and User
Magento uses MySQL database to manage site data, like product and order information. You have MySQL installed and configured, but you need to make a database and a user for Magento to work with.
First, log into the MySQL root account:
mysql -u root -p
You will be prompted for MySQL’s root account password, which you set when you installed MySQL. Once the correct password has been submitted, you will be given a MySQL command prompt.
First, you’ll need to create a database that Magento can write data to. In this example, the database will be called magento, but you can name it differently.
CREATE DATABASE magento COLLATE utf8_general_ci;
Note: Every MySQL statement must end in a semi-colon (;), so check to make sure that you included that if you are running into any issues.
Next, you need to create a new MySQL user account that will be used exclusively to operate on the new database. Creating one-function databases and accounts is a good practice, as it allows for better control of permissions and other security needs.
We are going to call the new account magento and will assign it a password of password. You should definitely use a different username and password, as these examples are not very secure.
CREATE USER magento@localhost IDENTIFIED BY 'password';
At this point, you have a database and a user account that are each specifically made for Magento. However, the user has no access rights to the database. We need to link the two components together by granting our user access privileges to the database:
GRANT ALL ON magento.* TO magento@localhost IDENTIFIED BY 'password';
Now that the user has access to the database, you need to flush the privileges so that MySQL knows about the recent privilege changes that you’ve made. Once that is done, you can exit out of the MySQL command prompt.
FLUSH PRIVILEGES;

exit
You should now be back to your regular SSH command prompt. Try to log in with the new credentials. If the MySQL monitor displays, you created the database properly. If an error displays, repeat the preceding commands.
Step 5 — Install Composer
We are now ready to download and install Magento. To see what the latest stable version of the Magento 2 Open Source is, head over to the Magento download page. In this example, the current release number was Magento 2.3.4, but you should always choose the latest release available to you. It is recommended to use the latest version of Magento 2, as new releases often include important security updates in addition to new and improved features.
In this guide, we will use Composer to install Magento 2. It is the recommended by Magento option as it ensures the ability to reuse third-party libraries, reduces extension conflicts and compatibility issues, allows to use the Magento software in a production environment, etc.
Type in the following command to install Composer. You will need Composer to install Magento with all its dependencies:
$ sudo curl -sS https://getcomposer.org/installer | php
You also need to make Composer globally available on your Ubuntu system.
$ sudo mv composer.phar /usr/local/bin/composer
Now you need to check the composer installation using the below command:
composer -v
Step 6 — Generate Keys for your Magento Marketplace User Account
To continue the installation process, you need to specify Public and Private keys from our Magento Marketplace account. If you don’t have one yet, you can register here.
After we’ve successfully created an account with the Magento Marketplace, we need to login to Magento Marketplace here.
- Click on the Sign In button and put in the credentials that you used for registration.

- After you’ve logged in, click on your username dropdown in the top navigation bar and go to My Profile. You will be redirected to your account information.
- Click on Access Keys.

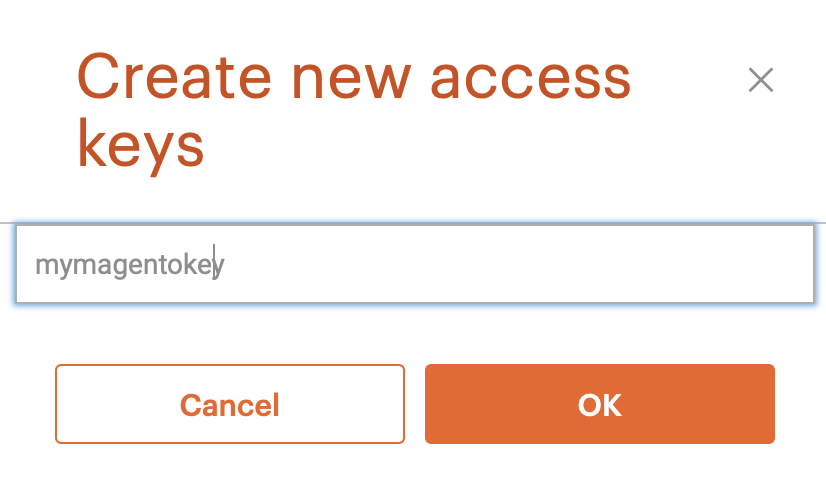
- Once on the new page, click on the Create A New Access Key button.

- Enter a key name and click OK to generate a new access key
After this, your Public and Private keys will be generated. Use these for installation in the next steps.
Step 7 — Download Magento Using Composer
To install Magento, you need to enter your servers root directory. Use the following command:
cd /var/www/html

$ sudo chown -R sammy:sammy /var /www
Create a new Compose project using the Magento Open Source metapackage.
composer create-project --repository-url=https://repo.magento.com/ magento/project-community-edition magento
Note:You can also create a Magento Commerce store, but in this guide, we will refrain to creating a Magento Open Source project.
You will be asked to provide a username and password. Put your public key from Magento Marketplaces as the username and the private key as the password. It will take some time for the Composer to download and install all the required dependencies, so you don’t have to worry about anything.
Step 8 — Install Magento
You can either use your Command Line Installer (CLI) or Web Setup Wizard to install Magento. This guide explains how to set up Magento with both Web Setup Wizard and CLI.
Step 8.1 — Install Magento with CLI
Type in the following command to Install Magento on your server.
cd magento/

bin/magento setup:install \

--base-url="http://yoururl.com/" \

--db-host="localhost" \

--db-name="dbname" \

--db-user="dbuser" \

--db-password="dbpass" \

--admin-firstname="admin" \

--admin-lastname="admin" \

--admin-email="[email protected]" \

--admin-user="admin" \

--admin-password="admin123" \

--language="en_US" \

--currency="USD" \

--timezone="America/Chicago" \

--use-rewrites="1" \

--backend-frontname="admin"
The above command should be edited to your needs. Update it with the data you used during the installation process. If you followed this guide step-by-step, would need to add the following changes:
http://yoururl.com/ – your public IP address or domain name
db-host="localhost" – magento@localhost
dbname – magento (database name used in this guide)
dbuser – magento
db-password – password
You can change other information as you want.
Step 8.2 – Install Magento with Web Setup Wizard
- Open your website in the browser, where you will be presented with the starting page of Magento Installation Wizard. After you read the license agreement, you will need to click Agree and Setup Magento.
- You will be presented with the next step where you will need to perform the readiness check by clicking the Start Readiness Check button.

If everything was configured properly, you will be greeted with the following page:

- Click Next to proceed with the setup procedure. You will be redirected to the page where you will need to add the database.
- At this stage, you need to set up how Magento connects to its MySQL database. Make sure that Database Server Host is set to “localhost”. You’ll then need to fill in Database Server Username, Database Server Password, and Database Name with the settings that you decided on when creating the MySQL database and new database user account earlier. Type in the data and click Next.

- The next step of the configuration process is where you can configure your store’s URL, along with a couple of other Apache-controlled functions. Make sure that Your Store Address matches your server’s domain name. If you don’t have a domain name set up yet, you can use your server’s public IP address for now.
It’s a good idea to change the Magento Admin Address to something less obvious than “admin” to make it more difficult for someone to find your admin panel.
The next step is to select the method of session data storage. Magento ships with two methods of saving user session data. The Files method stores sessions in files on the server and is the simplest method to start with. The Db (database) method stores sessions as entries in the MySQL database and is ideal for Magento installations that span across multiple servers. For now, we can stick with the Files methods.
You should also consider checking Use Apache Web Server Rewrites to make your site’s URLs more friendly to users and better optimized for search engines. The Apache module needed to support this functionality, mod_rewrite, has already been enabled and is ready for use.

- The next page is where you can change your locale settings, like language, time zone, and currency. Change these to the settings most appropriate to where your products are being sold, then hit Next.

- The last step before your Magento installation is ready is the creation of your admin account. This data will be used to log into your admin pane. Then click Next.

- Once you have completed the above steps, your Magento installation will be ready to use. Click Install Now to proceed with the installation.

- If you have configured everything right, you will be presented with the Success page with all Magento Admin Info. Make sure to keep this information to access your admin panel in the future.
Step 9 — Set File Permission
You need to set read-write permissions for the webserver group before you install the Magento software. This step is required so that the Setup Wizard and command line can write files to the Magento file system. Use the following commands:
$ sudo find var generated vendor pub/static pub/media app/etc -type f -exec chmod g+w {} +

$ sudo find var generated vendor pub/static pub/media app/etc -type d -exec chmod g+ws {} +

$ sudo chmod u+x bin/magento

$ sudo chown -R www-data:www-data /var/www/
Step 10 — Check Magento Installation
Once you have completed your Magento installation, it will be ready to use. Check your new storefront by visiting your server’s domain name or public IP address in your web browser
http://server_domain_name_or_IP/
If everything was configured correctly, you should be presented with a storefront that looks something like this:

You can also visit your new admin site by going to the admin directory that you set previously:
http://server_domain_name_or_IP/admin/
Log in with your admin username and password to see your admin dashboard.

Conclusion
Now that you have your Magento store up and running, you are ready to begin building your project catalog and start selling!